The mass mailer sends a designed email to a segment of your customers — a price change, a new product, a seasonal offer. You build the email visually, describe the audience with a handful of rules, check how many people that comes to, and either save a draft or schedule the send. This article is for operators.
Before you start #
Note: The mass mailer is gated on the
manage_campaignspermission. That key is not part of the shipped permission set, so in a default install only a Super Admin can open these screens.
Two things must be working before a campaign will actually go out:
- Outbound mail — configured under Platform Settings → Mail Settings.
- Queue workers, including one consuming the
bulk-emailqueue, plus the scheduler runningcampaigns:process-scheduled(it is registered to run every minute).
Creating a campaign #
- Open Mass Mailer → Create Campaign.
- Give it an Internal Name — this is for your list, not for recipients — and an Email Subject.
- Build the Email Body in the editor, or pick a saved template from the dropdown and select Load Template.
- Set the Segmentation Rules, then select Calculate Audience Size to see how many people match.
- Set Schedule At, choose a Save Action, and save.
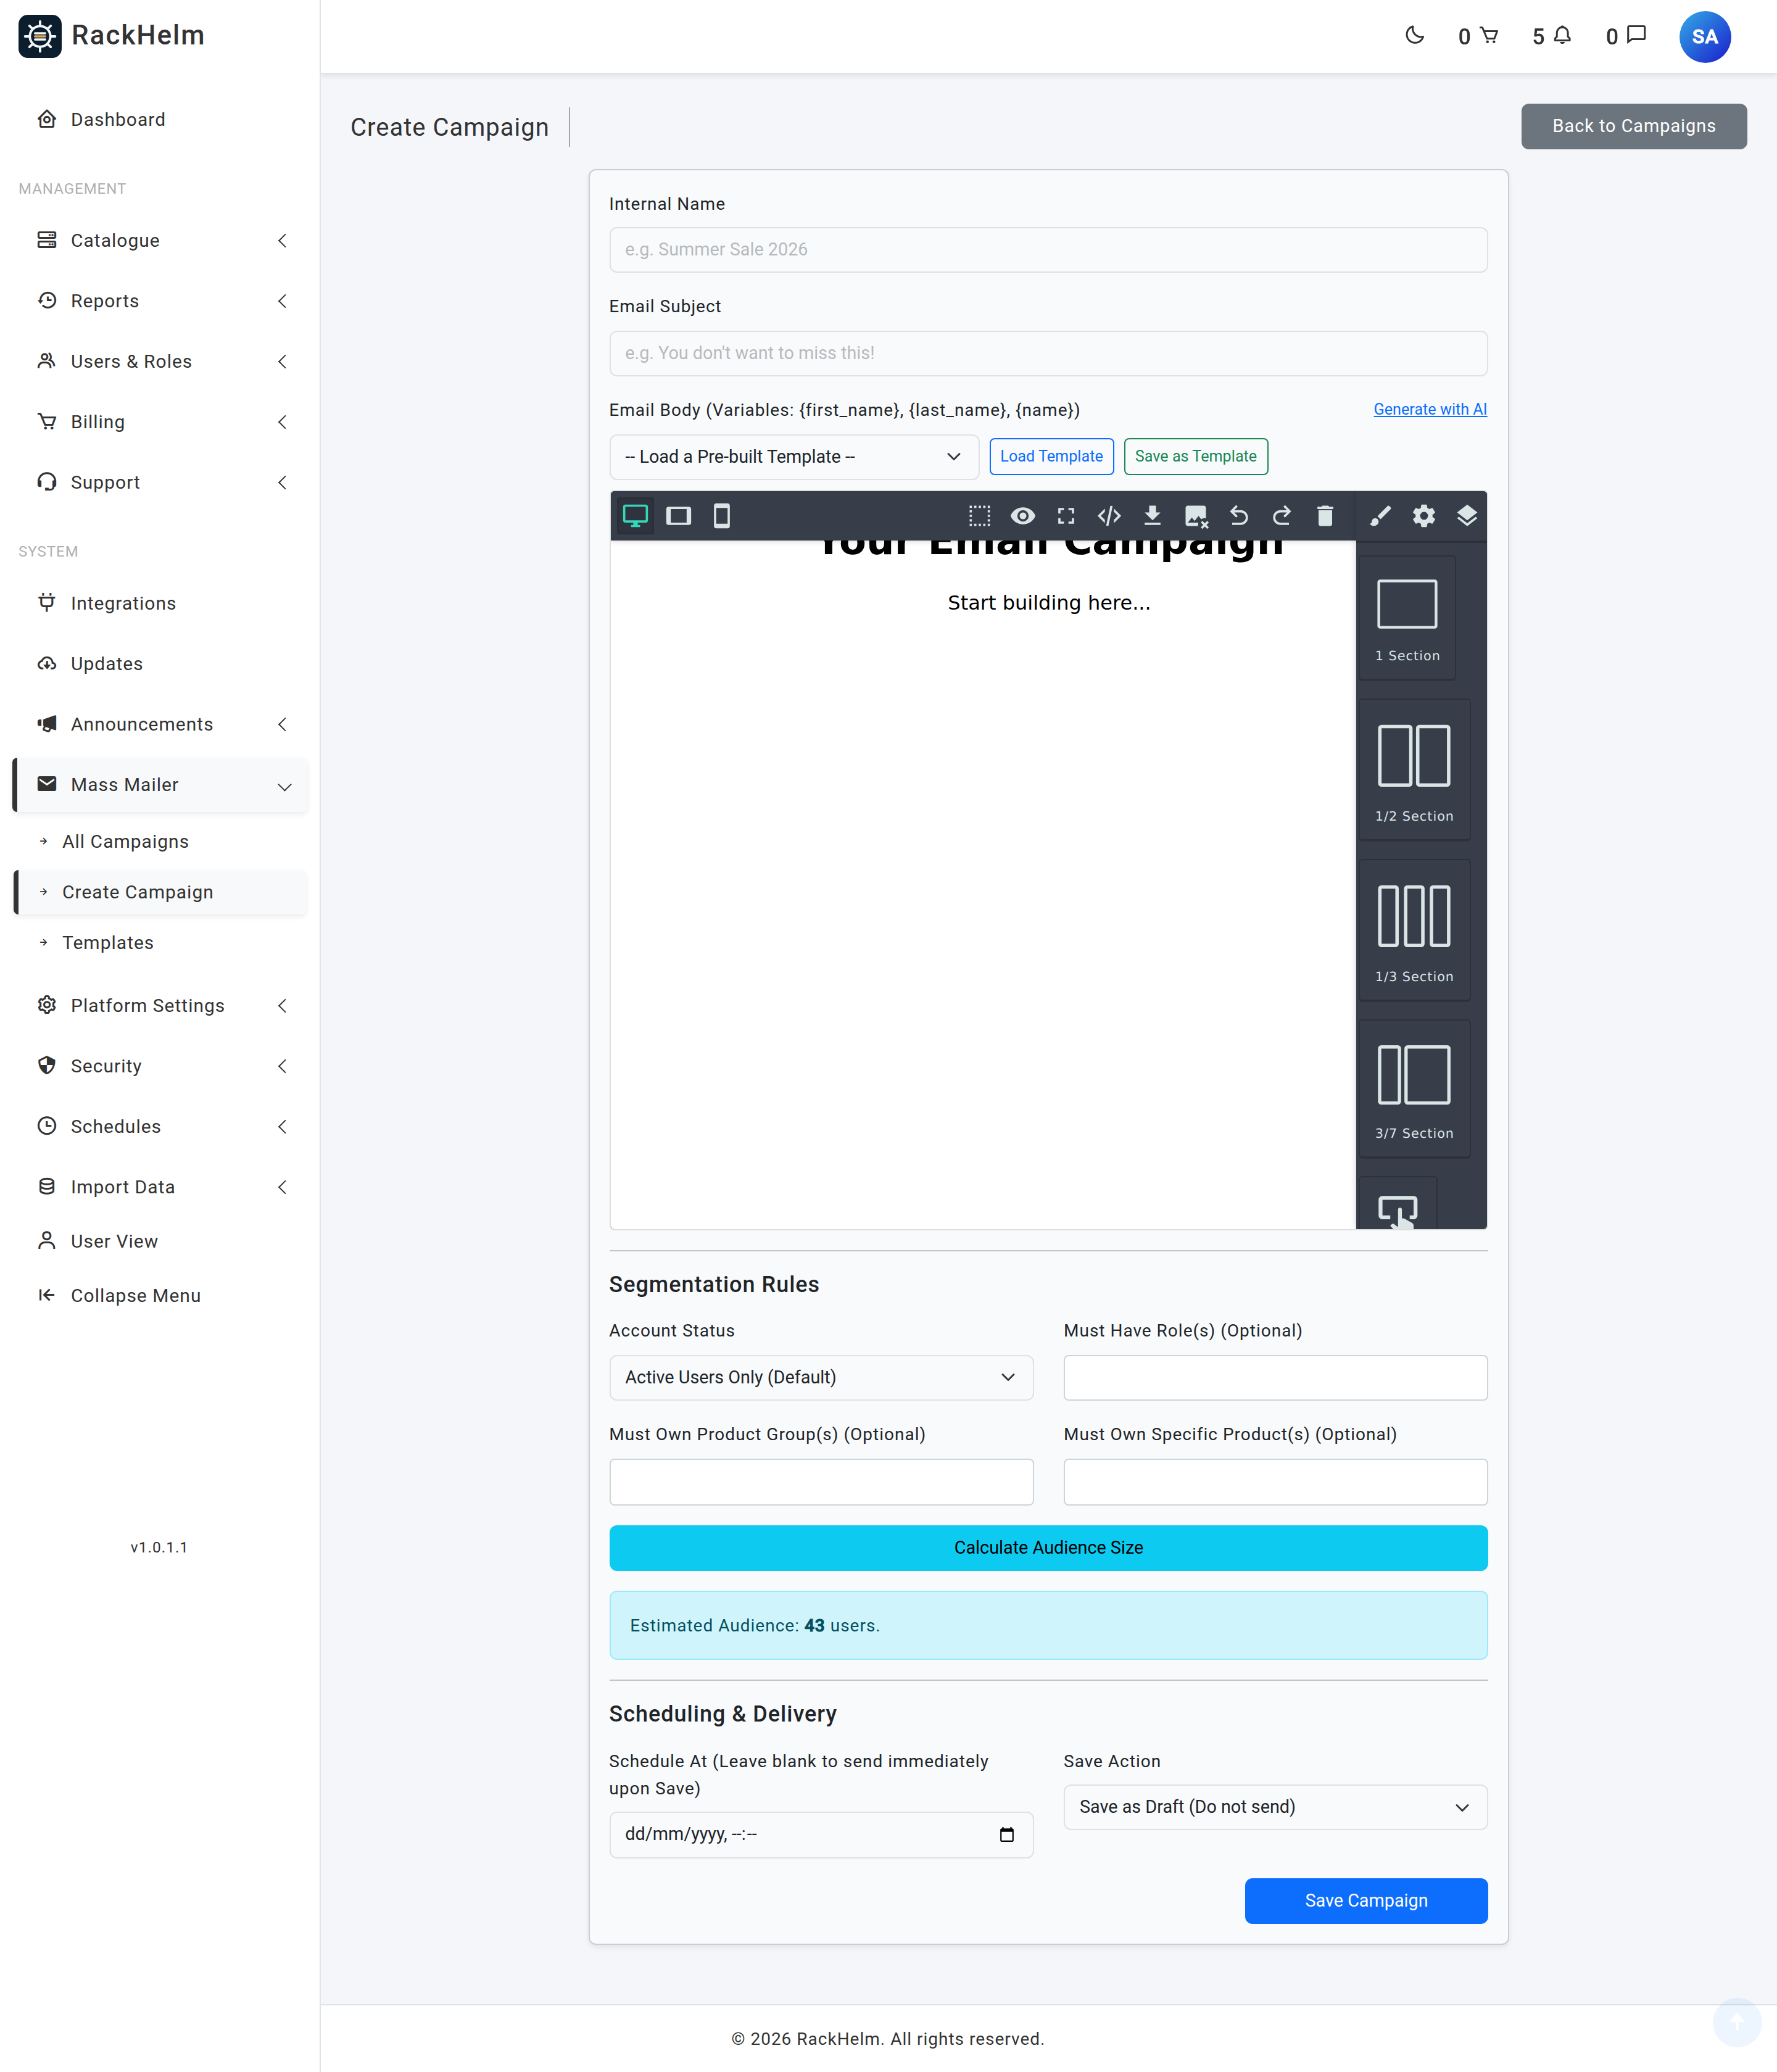
| Field | What it does |
|---|---|
| Internal Name | Required, up to 255 characters. Shown only in the admin list. |
| Email Subject | Required, up to 255 characters. |
| Email Body | Required. Built in a drag-and-drop email editor tuned for newsletters. Supports the variables {first_name}, {last_name} and {name}. |
| Schedule At | When the campaign should go out. Leave it blank and choose Schedule / Send to send as soon as the scheduler next runs. |
| Save Action | Save as Draft (Do not send) or Schedule / Send. Only these two states can be saved — “processing” and “completed” are set by the sender. |
Choosing the audience #
Two rules always apply and cannot be switched off: the recipient must be marketing opted-in, and must not be a guest account. On top of that:
| Rule | Effect |
|---|---|
| Account Status | Active Users Only (Default), Everyone, or Disabled Users. |
| Must Have Role(s) | Recipient must hold at least one of the selected roles. |
| Must Own Product Group(s) | Recipient must have a service from one of these groups. |
| Must Own Specific Product(s) | Recipient must have a service for one of these products. |
Ownership counts services that are active or pending cancellation. Where both product and group rules are set, matching either is enough; the role rule, when set, applies on top.
Warning: Accounts are marketing opted-in by default and there is no opt-in checkbox in the customer’s own settings — the unsubscribe link in a campaign email is the only way a customer switches it off. Make sure that matches the consent position set out in your privacy policy before you send anything promotional.
Templates #
A campaign template is a saved email body you can reuse. Manage them under Mass Mailer → Templates, or create one without leaving the campaign editor with Save as Template. A template has just two fields, Template Name and Template Body; loading one replaces whatever is currently in the editor.
Sending, and what happens next #
Nothing is sent from the browser. Once a campaign is scheduled and its send time has passed:
- The scheduled task picks it up and marks it processing, which also stops it being picked up twice.
- The audience is resolved and walked in batches of 500. A recipient row is created for each person.
- One send job per recipient is queued on the
bulk-emailqueue. - The campaign is marked completed.
Note: “Completed” means every message has been queued, not that every message has been delivered. Actual delivery depends on your workers and your mail provider.
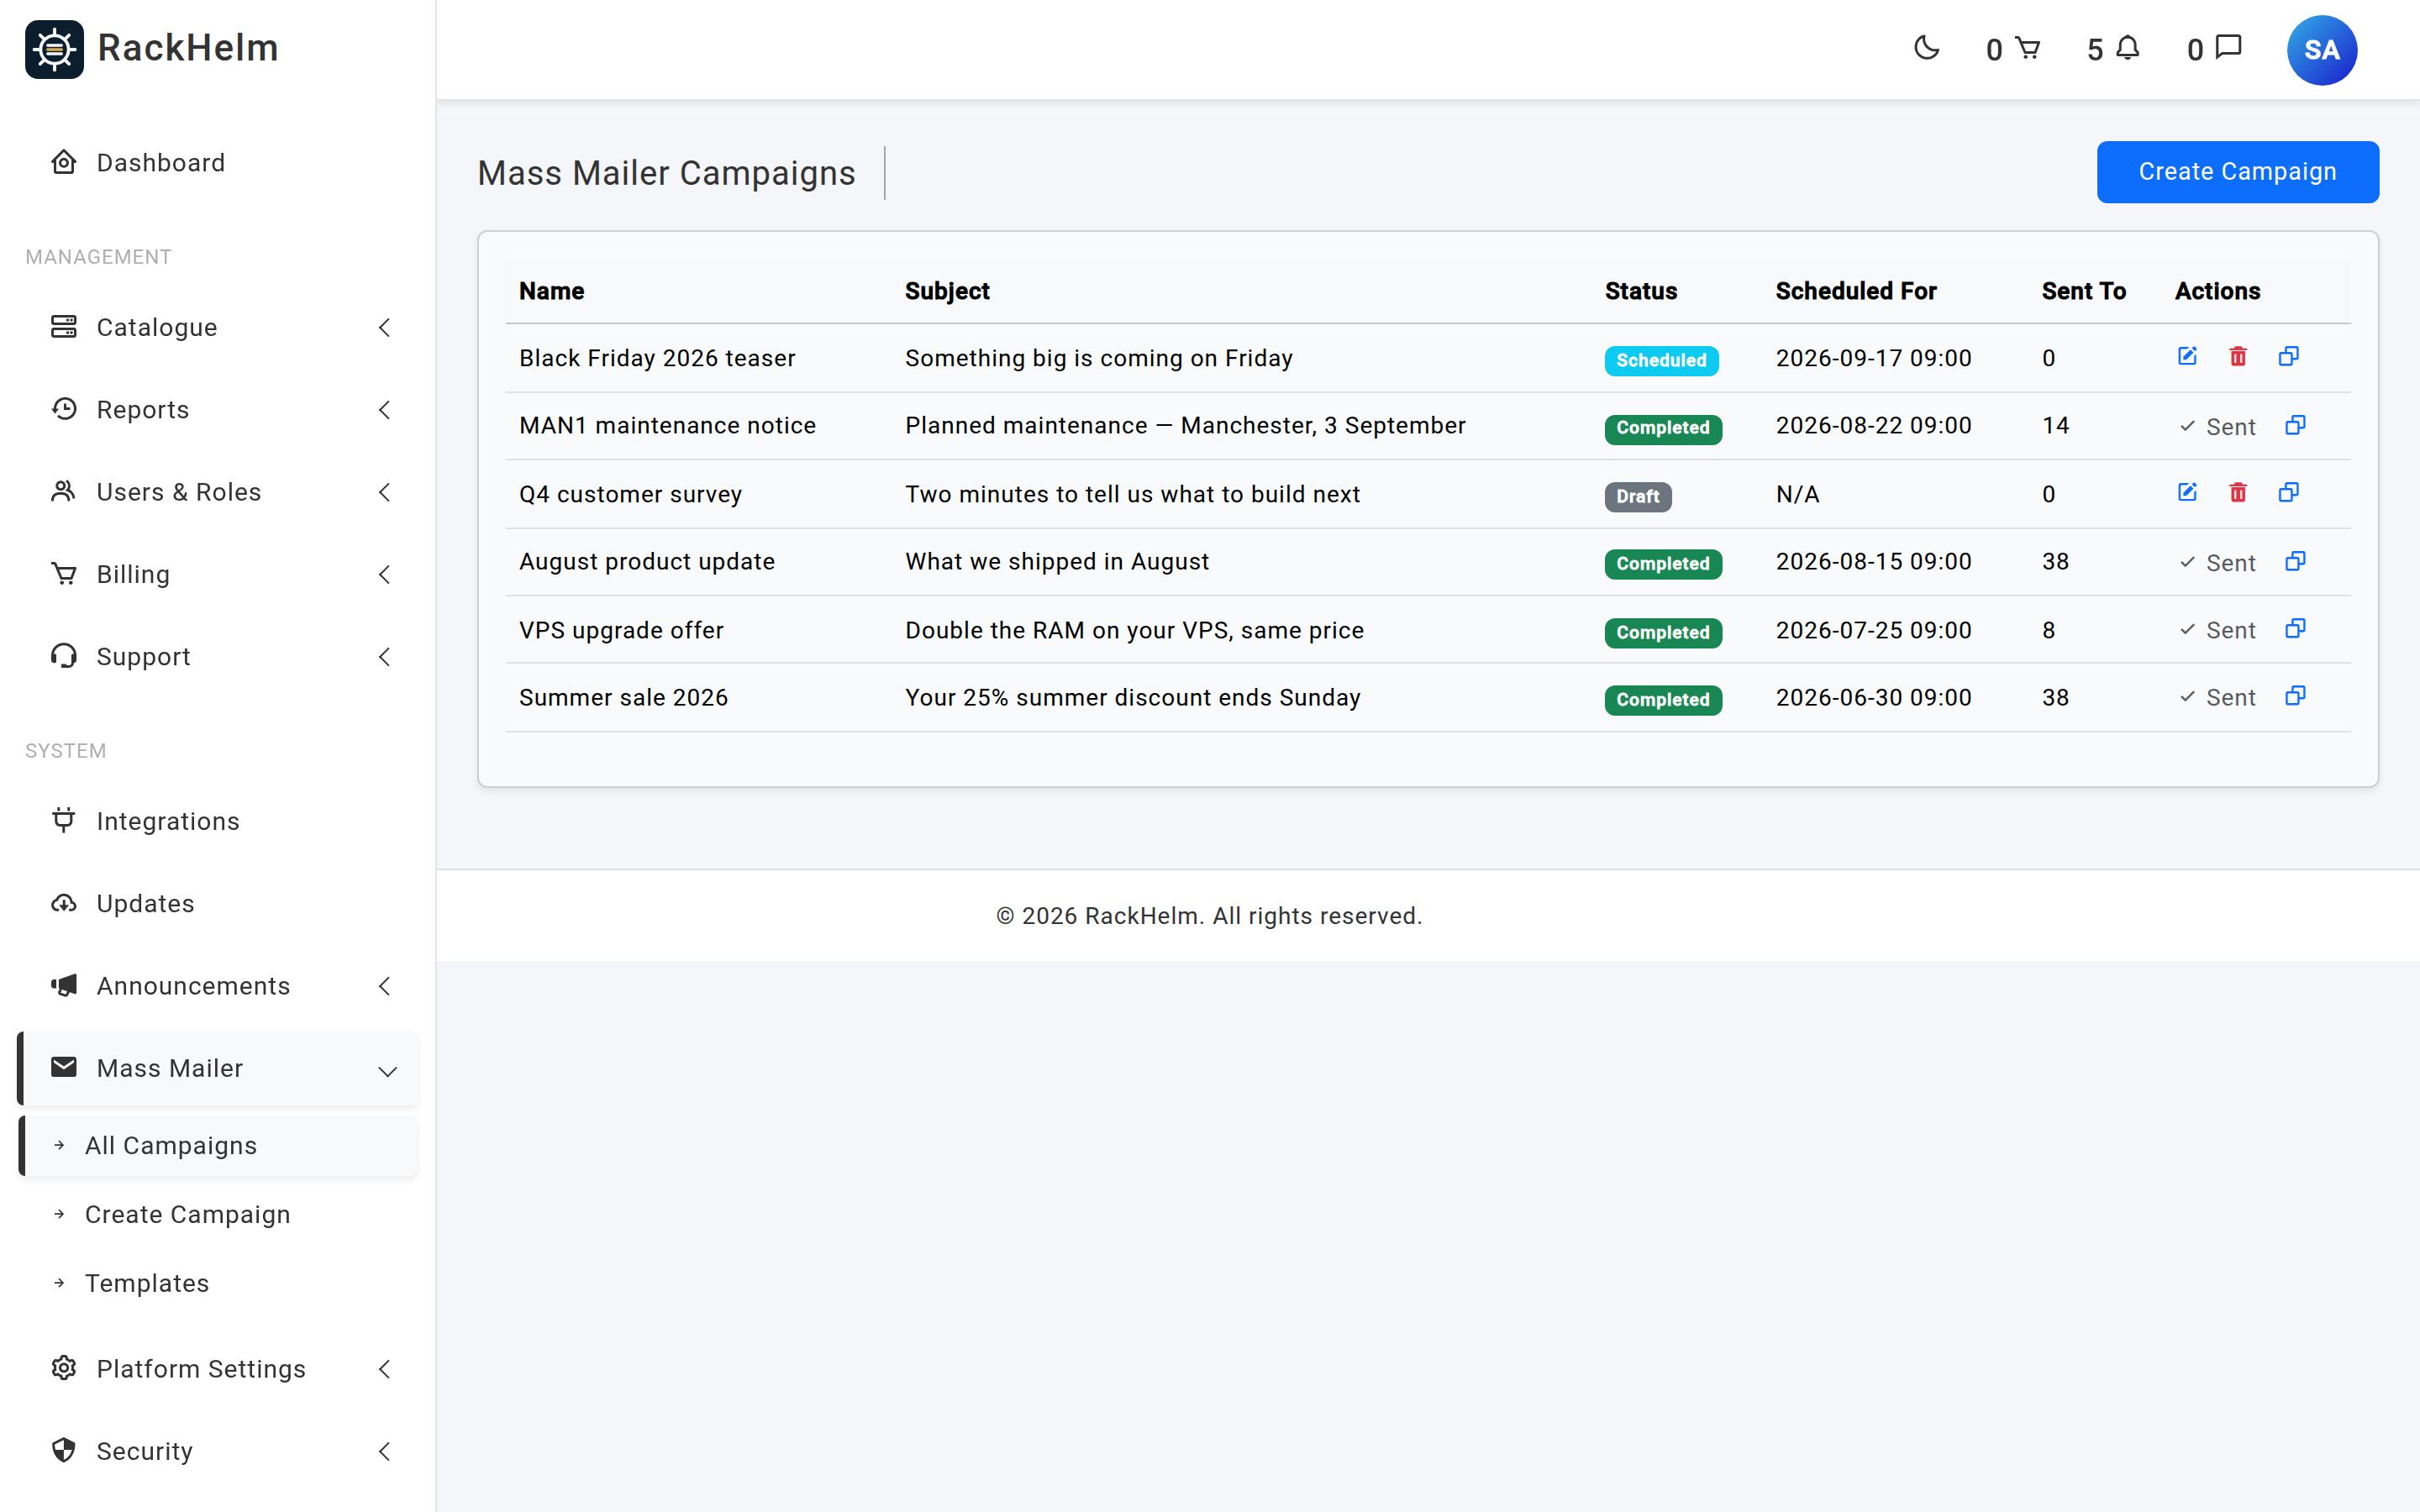
A campaign that is processing or completed can no longer be edited or (for processing) deleted. Use Duplicate on the list to copy it into a fresh draft named “… (Copy)” with the schedule cleared.
Send Preview Email on the edit screen sends the campaign to your own address, rendered exactly as a recipient would receive it.
Tracking and unsubscribe #
Every campaign email has two things appended automatically:
- A 1×1 tracking pixel. The first time a recipient loads it, the open is recorded against their recipient row.
- An unsubscribe block. The link opens a confirmation page; the customer’s marketing opt-in is switched off only once they confirm there.
Both links are cryptographically signed and rate limited to 60 requests a minute, so they cannot be forged or replayed against other accounts. The campaign list’s Sent To column shows how many recipient rows exist for each campaign.
Troubleshooting #
| Symptom | Cause and fix |
|---|---|
| A scheduled campaign never sends | The scheduler is not running. Confirm the cron entry that runs Laravel’s scheduler exists, and that campaigns:process-scheduled appears in it. |
| Status says Completed but no email arrived | The messages are queued on bulk-email. Make sure a worker is consuming that queue, then check your mail logs. |
| Audience size is 0 | The rules exclude everyone. Remember the two mandatory rules: guests are excluded, and anyone who has unsubscribed is excluded. |
| “Cannot edit a processing or completed campaign” | Duplicate it instead and edit the copy. |
| Opens are always zero | Most mail clients block remote images by default, so open tracking under-reports. Treat it as a floor, not a count. |
| An unsubscribe link says the link is invalid | The signature was altered — usually a mail client rewriting the URL, or the link being copied by hand. Ask the customer to click it directly from the email. |
| The campaign sent to fewer people than the calculated audience | The audience is resolved again at send time; anyone who unsubscribed or was disabled in the meantime drops out. |


