An integration is the connection half of a Custom API: where the remote service lives, how to authenticate to it, how long it may take and what it is allowed to be told. The calls themselves are endpoints, and you add those afterwards. This article covers creating the integration and every setting on its editor.
Before you start #
Warning: This screen requires the
manage_custom_apispermission, held by Super Admin only by default. Creating an integration means choosing an outbound destination URL and the data that travels to it, so treat granting this permission the same way you would treat handing out server access. See What the Custom API integration is.
Create the integration #
Custom APIs have no list page of their own — the Integrations screen is the list.
- Open Integrations (
/admin/panels). Custom APIs appear as a card group below the control panels. - On the + Add custom API card, select New integration — the button reads Get started until the first integration exists.
- Fill in the five things that cannot be guessed, then choose Create & add endpoints.
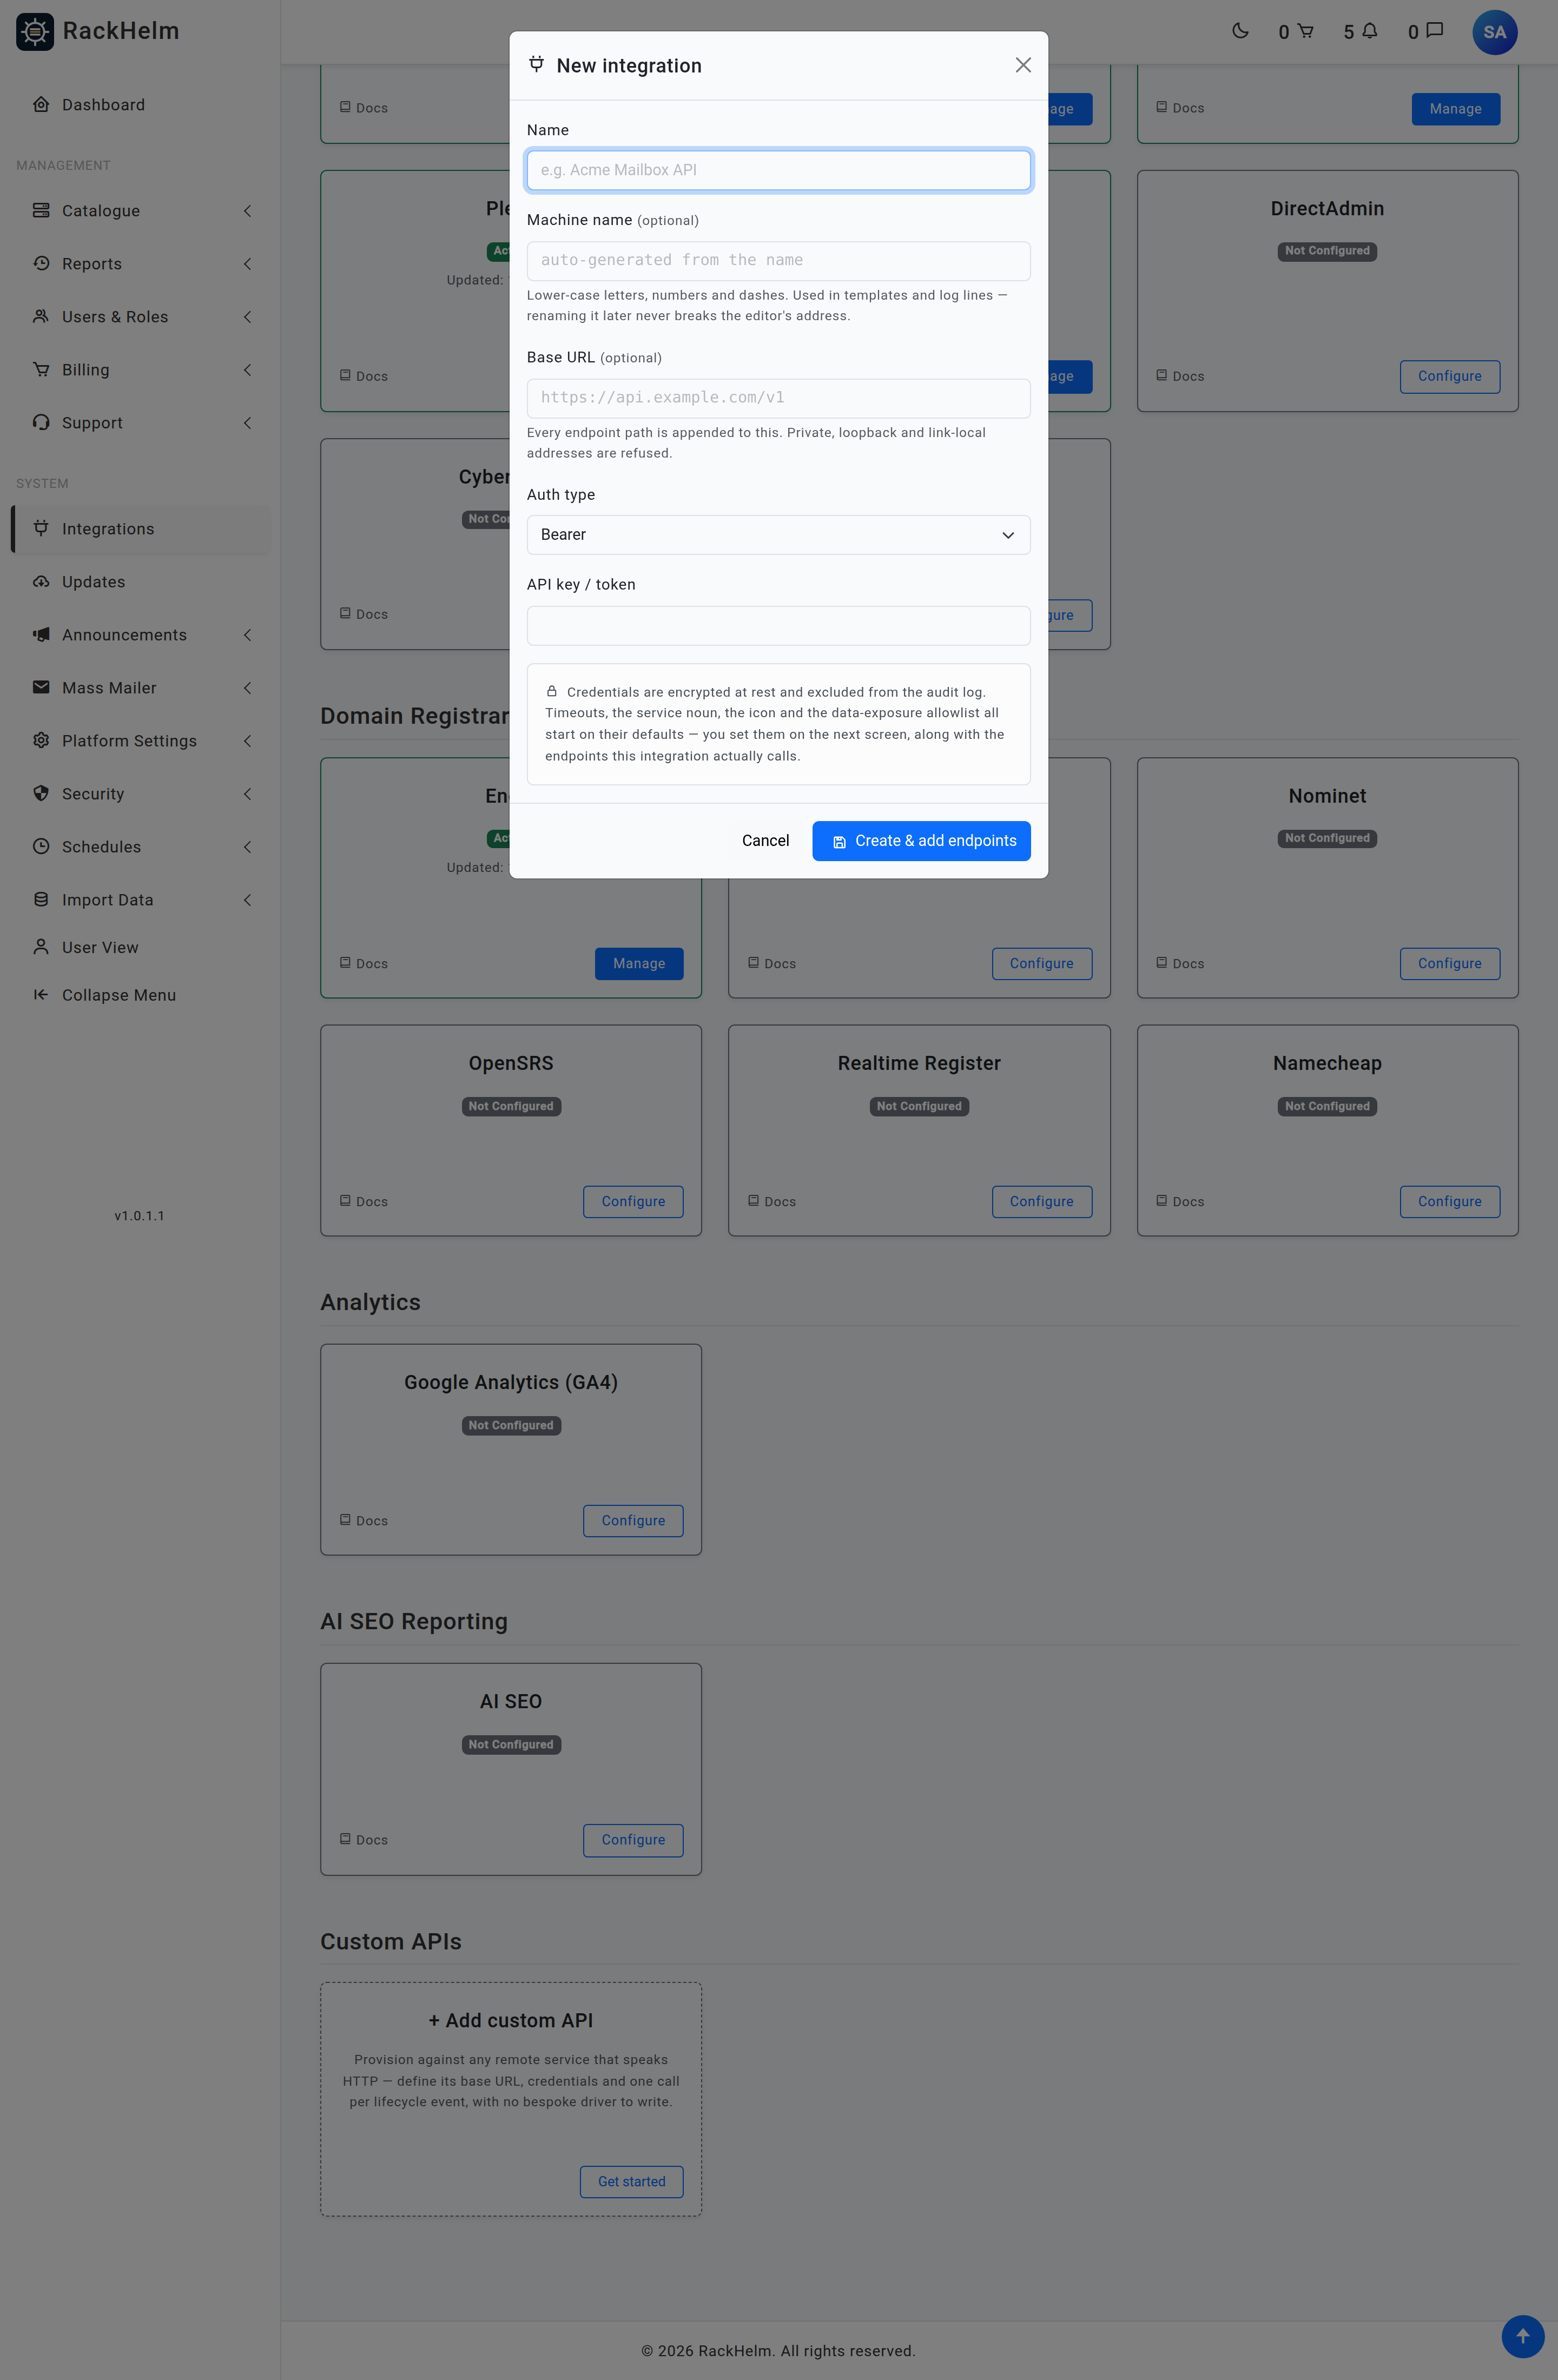
| Field | What it does |
|---|---|
| Name | Display name, up to 120 characters. Required. |
| Machine name | Lower-case letters, numbers and single dashes, up to 80 characters, unique across live integrations. Leave it blank and it is generated from the name. |
| Base URL | Optional here, but every endpoint path is appended to it. Private, loopback and link-local addresses are refused. |
| Auth type | One of none, basic, bearer, header, query. |
| Header name / Query parameter name | Shown only for the header and query schemes, and required for both. Up to 120 characters. |
| Username / Password | Shown for basic. Up to 500 characters each. |
| API key / token | Shown for bearer, header and query. Up to 2,000 characters. |
Saving generates a 48-character signing secret and shows it once, in a green banner at the top of the editor. It is stored encrypted and cannot be read again — copy it now if the remote system is going to verify signatures. See Request signing.
Note: The machine name is the integration’s driver name. It travels in the
X-RackHelm-Integrationheader, appears in log lines and can be used as a service filter for customers. It is not what a product stores when you attach it: the canonical binding key on a product isconfig['custom_api_id'], which holds the integration’s id. Renaming the machine name therefore never breaks a wired-up product or this editor’s address.
The editor #
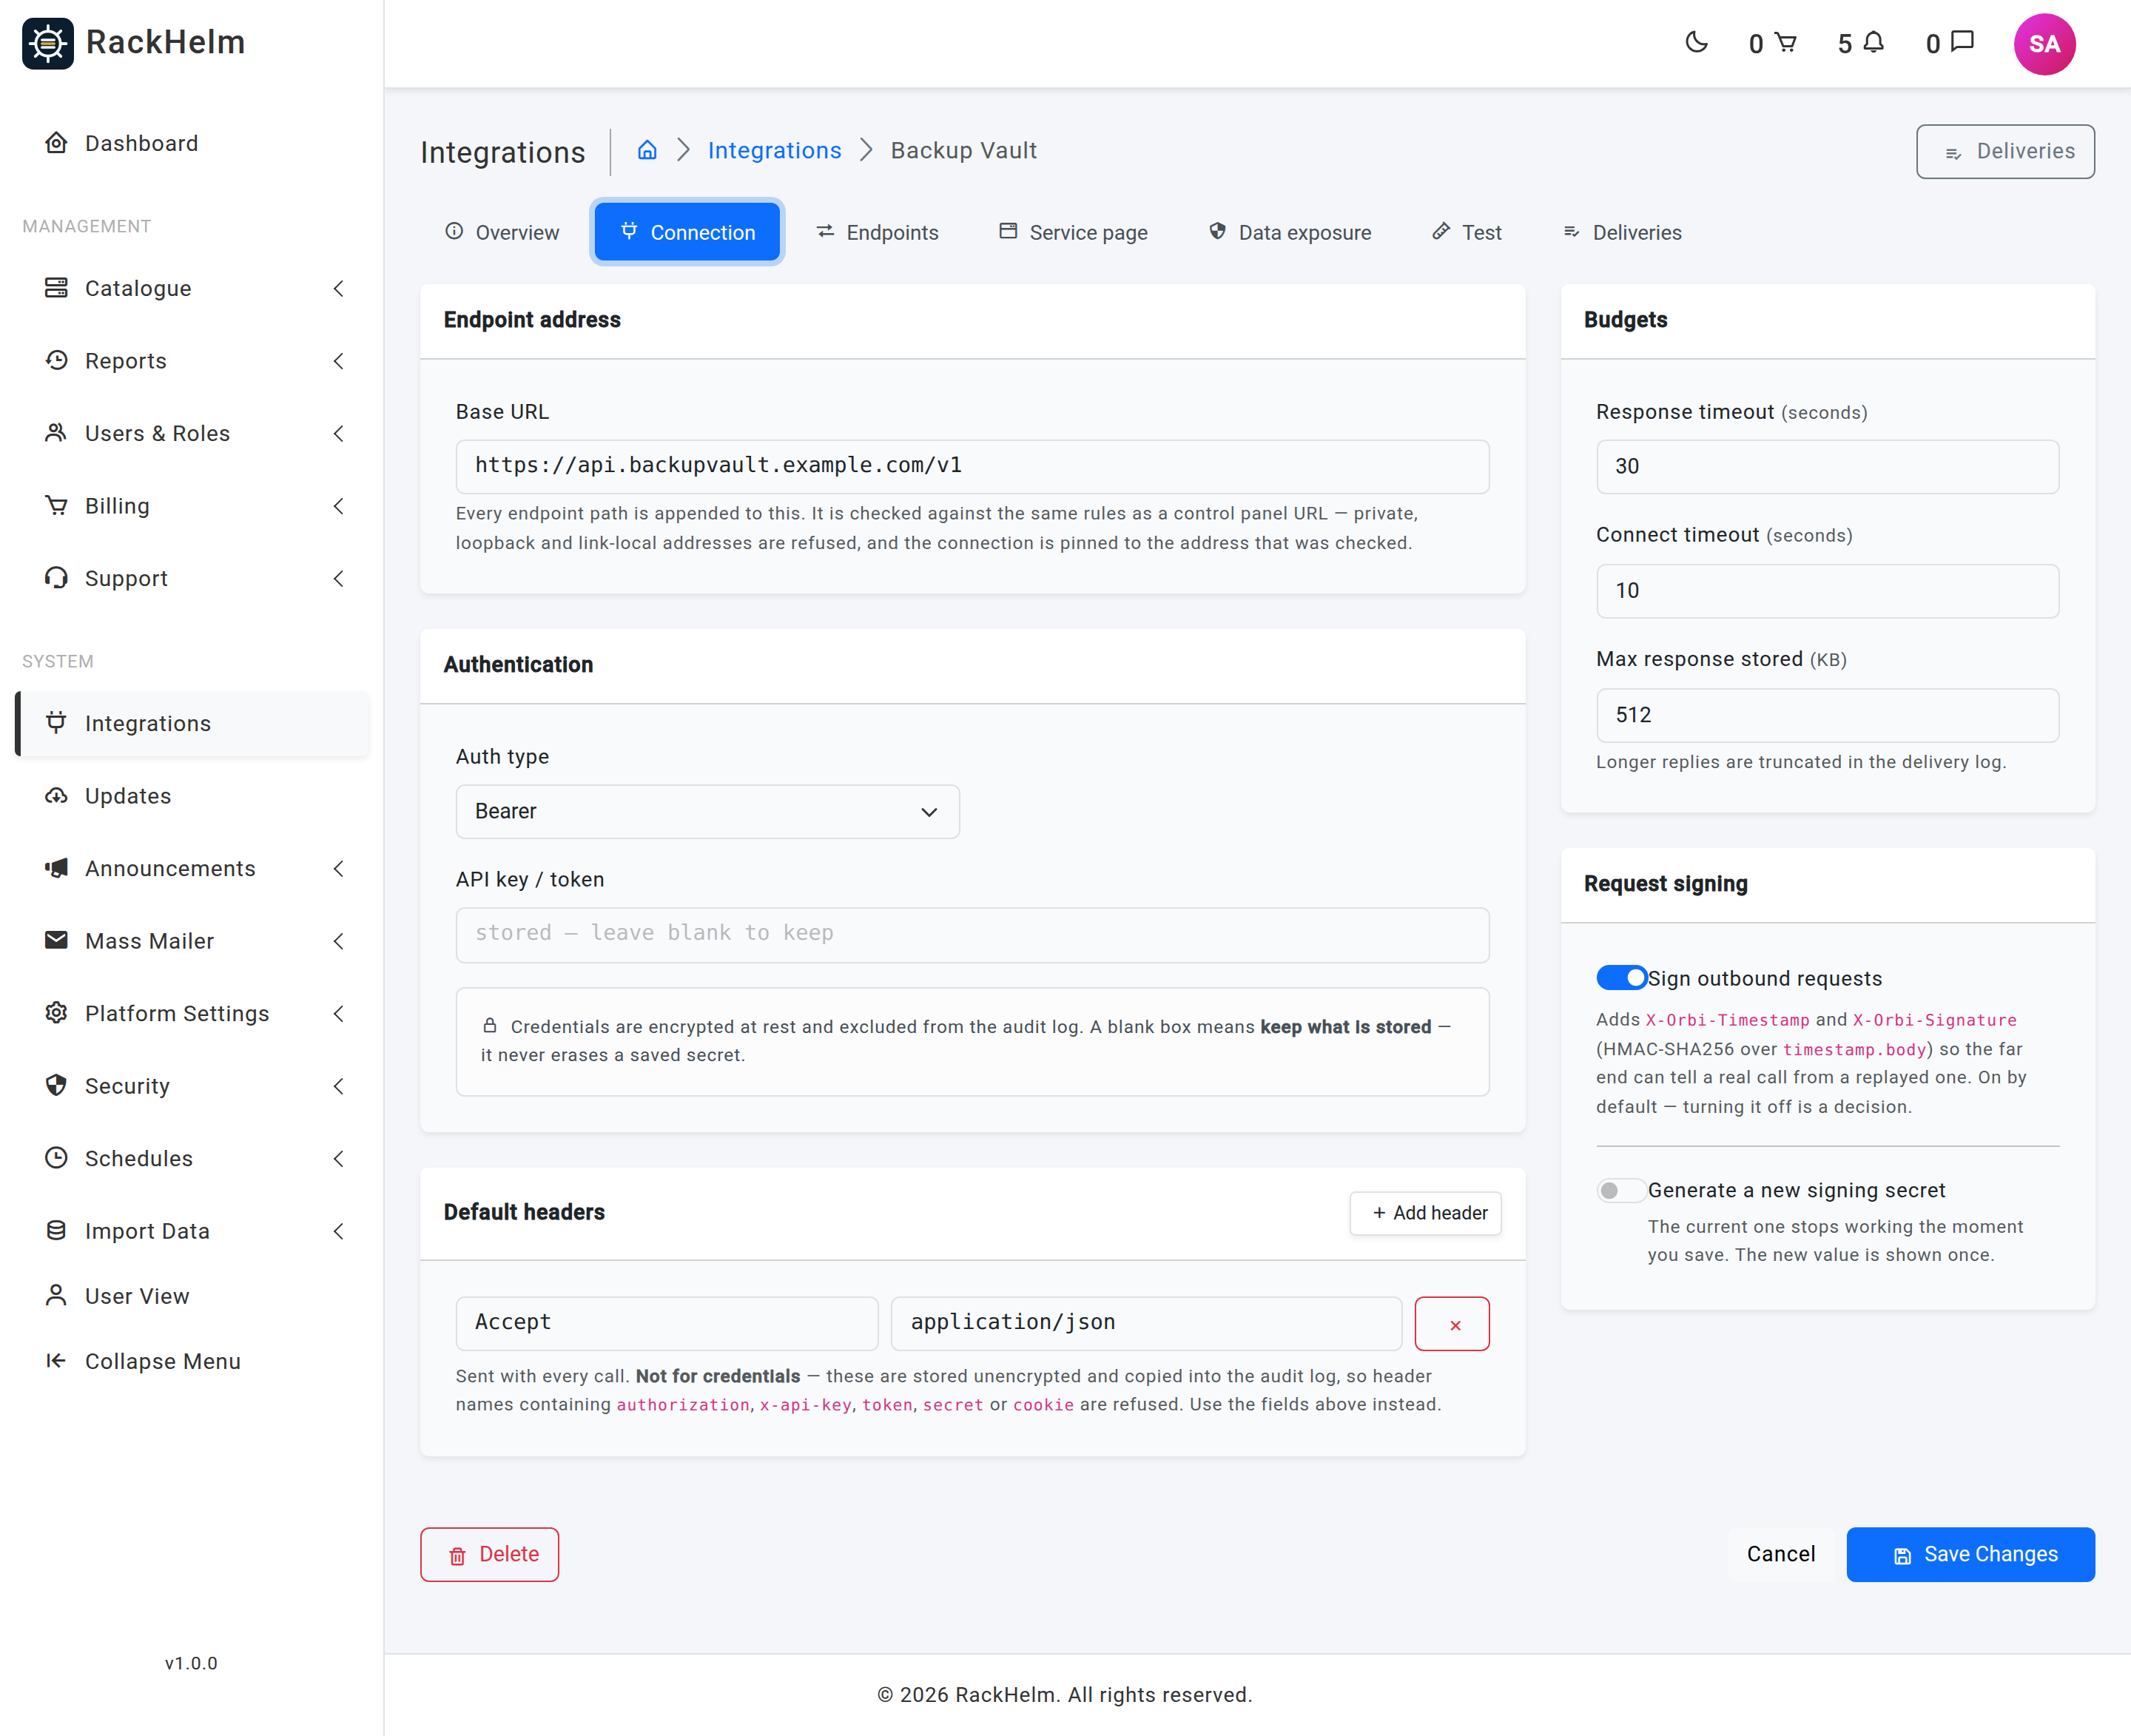
You land on /admin/custom-apis/{id}/edit, which has seven tabs: Overview, Connection, Endpoints, Service page, Data exposure, Test and Deliveries. Overview, Connection and Data exposure all belong to one form — press Save Changes once, at the bottom, and all three are saved together. Endpoints and fields save independently through their own modals.
Overview #
| Field | What it does | Default |
|---|---|---|
| Name | Display name, up to 120 characters. | — |
| Machine name | As above. Re-derived from the name if you clear it. | from the name |
| Description | Free text, up to 2,000 characters. Use it for what this provisions and who to contact when it breaks. | empty |
| Service noun | What the customer’s service page calls one of these — “Mailbox”, “Licence”, “VPN”. Required, up to 60 characters. | Service |
| Icon | Any Boxicons class, up to 60 characters. | bx bx-package |
| Active | When off, every event is cancelled before it is sent and the Test tab refuses to fire. | on |
| Offer as a filter on the customer’s services list | Adds a filter chip on /services for customers who own one of these. |
on |
Connection #
Base URL is checked with the same rules as a control panel URL, at save time as well as at send time. Two things are rejected outright:
- private, loopback and link-local addresses;
- a URL carrying a username or password (
https://user:pass@host) — that credential would be copied verbatim into the audit log and into every delivery’s request URL, where header redaction cannot reach it. Put credentials in the fields below instead.
Authentication — the scheme decides which credential the driver reads and what it puts on the wire:
| Auth type | What RackHelm sends |
|---|---|
none |
Nothing. Use it when the endpoint is public or authenticated by a signed body. |
basic |
Authorization: Basic <base64 username:password>. A missing username fails the call before it leaves the box. |
bearer |
Authorization: Bearer <token>. |
header |
Your Header name carrying the token, for example X-API-Key. The name may only contain letters, numbers, dashes and underscores. |
query |
Your Query parameter name appended to the URL, defaulting to api_key if left blank. |
Tip: A blank credential box means keep what is stored, never “erase it”. The placeholder tells you which it is — “stored — leave blank to keep” versus “not set”. To change a credential, type the new one; to remove one, switch the auth type.
Default headers is a key/value repeater (up to 30 rows; names up to 120 characters, values up to 1,000) sent with every call from this integration. It is not for credentials, and RackHelm enforces that: any header name containing authorization, x-api-key, token, secret or cookie is refused, because plain headers are stored unencrypted and copied into the audit log for anyone holding view_audit_logs.
Budgets #
| Field | Range | Default | What it does |
|---|---|---|---|
| Response timeout | 1–120 seconds | 20 | How long the whole request may take. |
| Connect timeout | 1–60 seconds | 10 | How long the TCP/TLS handshake may take. |
| Max response stored | 1–1024 KB | 64 | A reply declaring or exceeding this is refused and not decoded, so a half-document can never be read as a success. |
Request signing #
Sign outbound requests is on by default. Turning it off is a decision, not a tidy-up. Generate a new signing secret rotates the key on save — the old one stops working immediately and the new value is shown once. Full detail in Request signing.
Attach it to a product #
- Open Catalogue → Catalogue & Groups and edit the product.
- On the integration selector, choose Custom API.
- Pick the integration from the Custom API dropdown and save.
The help text under the dropdown updates to confirm the service noun and how many endpoints the integration has. If it says the integration has no endpoints, nothing will be called on an order.
Deleting an integration #
Delete is blocked while any product still points at the integration — RackHelm tells you how many, and you unpick them yourself, because only you know whether you are retiring it or replacing it. Once deleted, the row is soft-deleted: its delivery history and the service attributes it captured stay readable for audit, and its machine name is released for re-use.
Troubleshooting #
| Symptom | Cause and fix |
|---|---|
| “The machine name may only contain lower-case letters, numbers and single dashes.” | You typed capitals, spaces or punctuation. Clear the box and let it be generated from the name. |
| “Remove the username/password from the URL…” | The base URL contains user:pass@. Strip it and use the credential fields. |
| The base URL is rejected as unsafe | It resolves to a private, loopback or link-local address. A Custom API must target a publicly routable host. |
| A default header is refused | Its name contains a reserved word. Move the value into Credentials and let the auth type add the header. |
| You never copied the signing secret | It cannot be recovered. Tick Generate a new signing secret, save, copy the new value, and give it to the remote system. |
| Saving the form appears to wipe a credential | It does not — blank means keep. If a credential genuinely stopped working, retype it rather than assuming the save cleared it. |
| “This integration is still used by N products.” | Point those products at another integration (or another type) before deleting. |


